
Covid-19 pipeline with Airflow and Python3
During this proving times, qualified and reliable data sources are key to enhance decision making process. With this in mind, our goal here is to build a simple data pipeline utilizing Airflow to orchestrate the jobs we need to run, and python to do all the data handling.
By the end of this process, we’ll have designed a pipeline utilizing ETL principles, enabling quality reports to be built from the data sources we’ll make available on AWS S3. Basic data pipeline to handle covid19 data sources utilizing Python and Airlflow. So let’s jump right at it !
Project’s source code repository
Airflow Introduction
![]()
I have no intention spending much time on Airflow introductions, there are plenty of comprehensive resources that aims on this subject, but I’ll go over some basics concepts utilized on this project:
Airflow is define by Apache as:
Airflow is a platform created by the community to programmatically author, schedule and monitor workflows.
It’s coded on python and can be installed on the latest version with pip.
pip/pip3 install airflow
It has base components to handle schedules and scripts runs:
DAG: stands for Directed Acyclic Graph and its basically a collection of tasks and theirs dependencies.
Task: Handles operators executions and have dependencies within a DAG.
Operator: Does the heavy lifting, running our code, it can be define to run python code, bash, …
Variables: Can be defined to be utilized application wise, allowing us to have a centralized repository of them.
Data Sources
The very first step usually is to understand what’s our goal with the data we’ll work on, it can be provide data to support reporting from a specific business area, build an data warehouse for a broader utilization, … and then map which sources allows us to deliver a solution that achieves those expectations. On our scenario, we want to gather data about the pandemic that’s going on and summarize it on a single data source for further utilization, with this definition, the data sources listed are:
John Hopkins University — JHU (Available on Google Big Query)
Education Development Center — EDC (Available on Google Big Query)
Our World in Data — OWID (.csv on their website)
All these data sources are updated on batch schedules in moments we don’t know/care, to address this, we’ll be scheduling our flow to run every 2 hours to catch any data modification. It’s important to point out this approach it’s not recommended.
ETL Design
After defining our data sources and goals, we start the ETL (extract, Transform, Load) design. To summarize, an ETL process usually consist of three layers:
Extraction layer:
Takes care of getting data out of the sources, creating a staging area that’s basically mirrors the data on source, but it enables data transformations to be more manageable and predictable.

We’ll be staging extraction data on .csv and pickle, we could use and SQL repository or any other data storage, but this two suits very well for the reality of our processing and data sources.
Pickle its an alternative way to store objects states on python, sometimes might be a better option than .csv for example, in this projection we are staging on both formats for sake of exemplification.
Transformation layer:
Commonly summarizes the data, adds business rules and dimensions information to the model, aiming mainly on enhancing querying and reporting, providing data with quality and availability.
Load layer:
Deliveries data to an application, reporting area, … It’s the final step where the data has to be ready for consumption.
Credentials
To achieve our goal, we’ll need credentials to make possible for python to handle data extraction from Google Big Query (GBQ) and later on our data flow we’ll have to write data on S3, so an AWS
Google Big Query
Googe has a very comprehensive documentation on how get this going (https://cloud.google.com/bigquery/docs/bigquery-storage-python-pandas).
For our project the objective is to download the credential.json and store it on a folder for adding it to a Variable on Airflow (explained on Setup Airflow).
AWS S3
To utilize S3, a credential is needed as well. The module utilized on python is boto3, and “Real Python” has a great tutorial how to setup this credential, cheers to these guys !! (https://realpython.com/python-boto3-aws-s3/).
There’s a python file on the project (credentials.py) that deals with these resources whenever we need them.
Data Extraction
So we start to dirt our hands finally, have in mind that we’ll be utilizing Airflow, so our project is designed to meet some structural requirements. Our tasks will run PythonOperators, so we need to provide a python callable (usually a function). source: researchviews.blogsport.com
Besides that, google designed its interface module python/Big Query to work with pandas’ dataframes, which is really good because pandas module its a very convenient choice for data manipulation , so keep in mind that most functionalities we’ll be using further are presented on pandas, in case you missed it, check it out some examples on how to work with pandas.
Moving on, we initialize our first task on our DAG file (covid19_datalake.py) and looks like this :
    # inside DAG definition

    extract_data = PythonOperator(
        task_id='extract_data',
	python_callable=data_extraction
    )
Initialize task extract_data (PythonOperator), data runs imported function data_extraction
At first glance, we notice that we have this data_extraction function that we’ll run whenever this task is called, and data_extraction its the function that is getting data from the sources we listed previously and creating extraction files.
On file extract_data.py we get Big Query clients needed as well initialize our DataHandler object, which does all the heavy lifting on data related manipulation.
    def data_extraction():
        bqclient = get_bqclient()
        bqstorageclient = get_bigstorageclient()

	#Extracting raw data section
        for source in DataHandler.data_source_list:
            data_handler = DataHandler(source)
            if data_handler.source_type == 'Big Query'
                data_handler.extract_data(bqclient, bqstorageclient)
            elif data_handler.source_type == 'CSV':
                data_handler.extract_data()
On data extraction, DataHandler runs through our list of 3 sources, retrieves the data and store it on two directories:
/EXT stores .csv/.json (raw data)
/EXT_PICKLE stores .pkl (raw data)
No data manipulation is done on this layer.
Data Transformation
After extraction is done, next step is transform our data. The raw data extract contains all sorts of information that might not be homogeneous between then. One example is that JHU data has a fine grain on state/province level while EDC and OWID works on a country level grain, other case is that not every source has latitude/longitude which usually its a desired information to reporting creation.
Given this scenario, we’ll be normalizing all 3 sources to a country/date fine grain, and define two measures that are “confirmed_cases” and “deaths”, to finish this process we’re adding geo location information.
To kick things off, we have a task definition very similar to what we’ve seen on extraction section.
    # DAG tasks

    transform_data = PythonOperator(
        task_id='transform_data',
	python_callable=data_transformation
    )

    #DAG tasks
On data_transformation we have the DataHandler picking a data source extension of choice (csv or pickle) to start.
Next we load a dataframe with country information (geolocation and iso_id) to be added later on our transformation and define which country field will be utilized on the join.
    def transform_data(self, input_format='csv'):
    """
    Aggregate data to date/country granularity, adds lat and long whether this data doenst exists
    :param ext_from: str/ csv or pickle, selecting wich data format to use and data input
    """
    country_latlong = '{}_country'.format(self.id)
    df_latlong = pd.read_csv(
        '{}/utils/dim_country.csv'.format(self.absdirname),
        usecols=[country_latlong,'latitude','longitude','iso_id']
    )
    df_latlong = df_latlong.rename(columns={country_latlong:'country'})
Having the lat/long dataframe properly set, next is load our data source of current iteration, map field names to be renamed (normalizing fields) thought out all data sets.
    # transform_data()
    if input_format == 'pickle':
        df = pd.read_pickle('{}/EXT_PICKLE/RAW_{}_DATA.pkl'.format(self.absdirname, self.id))
    else:
        df = pd.read_csv('{}/EXT/RAW_{}_DATA.csv'.format(self.absdirname, self.id))
    if self.id == 'JHU':
        country_map = 'country_region'
        deaths_map = 'deaths'
        cases_map = 'confirmed'
    elif self.id == 'EDC':
        country_map = 'countries_and_territories'
        deaths_map = 'deaths'
        cases_map = 'confirmed_cases'
    elif self.id == 'OWID':
        country_map = 'location'
        deaths_map = 'total_deaths'
        cases_map = 'total_cases'
Then we aggregate the data frame using groupby and agg. On .groupby section we define the granularity of our aggregation, and on .agg we define our measures and how they’ll be calculated
df_agg = df_ren.groupby([‘date’,’country’]).agg( {‘confirmed_cases’:’sum’,’deaths’:’sum’} )
The next step is to merge (left join on this case) our two dataframes (datasource and lat/long), we’ll use pd.merge to achieve this and its pretty straight forward how to parametrize
df_tra = pd.merge( df_agg, df_latlong, how=’left’, on=’country’ )
To finish the transformation process, we store our dataframe on two extensions (.csv and pickle) on these directories
/TRA stores .csv (transformed data)
/TRA_PICKLE stores .pkl (transformed data)
Data Load
The last stage is to upload both raw and transformed data to s3 on .csv and .json formats. We start things out with our task definition:
    # DAG defintion

    load_data_s3 = PythonOperator(
        task_id='load_data_s3',
        python_callable=data_load_s3
    )
This time data_load_s3 we’ll need to access a resource (S3 bucket), to do so, boto3 comes in to handle this interaction. Now AWS credential comes along, because its needed to allow the following operations. The core instructions to gather all resources we need from s3 are:
s3_resource = get_s3_resource() bucket_name = ‘covid19-datalake’ create_s3_bucket(s3_resource,bucket_name=bucket_name)
With these definitions, data upload can be manage by our DataHandler on upload_s3( ).
First thing is to define our s3 file path. S3 works a little different from a standar file storage system, its creates index by file paths, emulating a directory hierarchy as we know, so to especify how we want this hierarchy to be built, we have to proper find a composition to file_path_s3.
file_path_s3 = ‘{0}/{1}/{2}/{3}_DATA.{4}’.format( self.id, data_state, file_extension, self.id, str(file_extension).lower() )
One path example on this approach its: /JHU/RAW/CSV/JHU_DATA.csv
Next comes file thats going to be uploaded definition
file_name = ‘{}/TRA/{}_DATA.{}’.format(self.absdirname, self.id, file_extension.lower())
Having this all set, last step its to commit it to the specified bucket name:
s3.meta.client.upload_file( file_name, bucket_name, file_path_s3 )
And thats it, our algorithm we’ll run through all files and upload them on properly paths, finishing our pipeline.
Now we have to define tasks dependencies and setup somethings on Airflow and try to run the covid DAG.
Tasks Dependencies
To set dependencies, on our DAG definition file (covid10_datalake.py) we have to explicit define it, one way to do it is:
extract_data » transform_data » load_data_s3
This way, Airflow will schedule and run extract_data, then transform_data and finally load_data_s3. If any task fails the next one will not run automatically on default settings.
Setup Airflow
Best case scenario, a basic setup is:
pip/pip3 install airflow airflow initdb #initialize a sqlite database
This should handle installation, to run it, two services have to be executed:
airflow webserver airflow scheduler
Make sure both are running, you should see something like this, and the webserver will be served on 0.0.0.0:8000 probably.

If everything went well, its time to open the webserver, the index page presents all DAGS currently registered with a bunch of other informations, but our concern now is to ensure airflow finds our pipeline.
DAGs have to be stored airflow root folder, on a directory named dags (by default !), if you clone the git repo, the file covid19_datalake.py has to be stored on ~/airflow/dags. This way airflow will find our project.
My current directory structure is something like this:

If everything is in place, opening 0.0.0.0:800 should have our DAG listed and scheduled to run every 2 hours.

There’s a lot to cover here, I’ll focus on some resources, but feel free to mess around a bit.
We still have to define our Airflow Variable that’s part of credential process, to do so, go on Admin -> Variables
To define its pretty straight forward, the on key it has to be called GOOGLE_APPLICATION_CREDENTIALS and on val paste the path to your Google Big Query API credential, should be something like this /home/user/airflow/…/credentials/credential_file_name.json (without any qoutes).
If you have your DAG showing up and the variable is set, last requiment its to install all packages need, this can be done thought pip install -r requirements.txt (on git).
Great !!! Now we can run our DAG finally !!! On the very first panel, on links session, there’s a play button, press it and go go go, the three tasks we’ll be triggered as the previous succeeds.
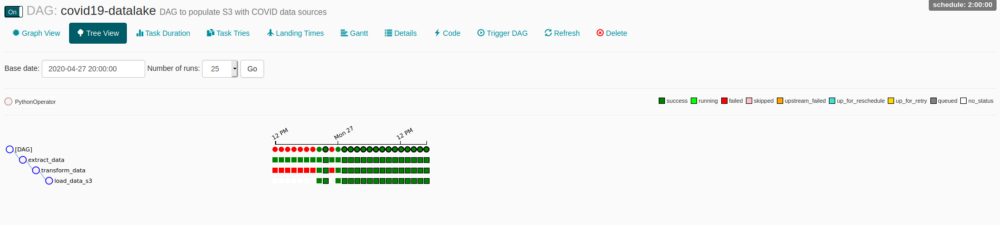
Clicking on DAG’s name you can access a lot of functionalities, one of my favorites is Tree View, its just a great overview of DAG and tasks instances, you can monitor every state, access logs, cancel runs, and much more, just by clicking on the bullets.
You probably will face some permissions issues, a simple way to solve it is add rw permission on dags dir/subdir, a way to do it is:
chmod -R ugo+rw
Don’t forget to turn on your schedule if you want it to keep on running. This information and many others can be set on default_parameters on DAG definition file.
Wrapping up
That’s it, we have built our data pipeline and deployed it on Airflow, there is room for a lot of improvement, feel free to try anything out ! Hope you guys enjoyed it, any doubts let me know throughout comments or git.
Stay safe folks !
Leave a comment